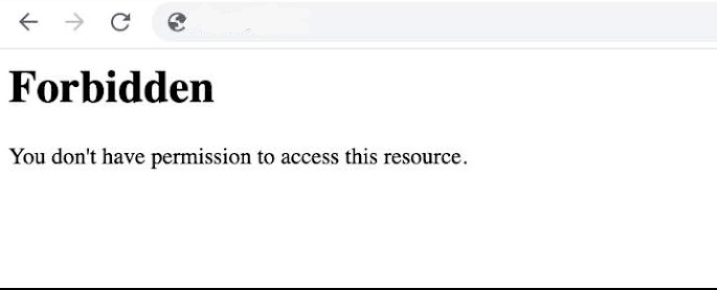
Are you facing an issue where you can’t access your website and see a message saying “Forbidden” or that you don’t have permission? If that’s the case, you’re likely encountering a 403 Forbidden error.
Encountering an error on your website can be frustrating, but don’t worry! We’ve prepared a helpful guide to assist you in fixing the 403 Forbidden error and getting your website back up and running smoothly.
Let’s jump right in without any further delay because we understand that you’re eager to resolve the issue and restore your website’s functionality.
What Is 403 Forbidden Error?
The 403 Forbidden error is an error message that you may encounter when trying to access a web page. It indicates that you don’t have the necessary permission to view the content you’re trying to access. The term “403” refers to the HTTP status code that the server sends back to your browser.
| Error code | 403 Forbidden Error |
| Error type | Client-side error |
| Error variations | Forbidden: You don’t have permission to access [directory] on this server HTTP Error 403 – Forbidden Error 403 – Forbidden 403 Forbidden request forbidden by administrative rules 403 Forbidden Access Denied – You don’t have permission to access Error 403 HTTP 403 Forbidden |
| Error causes | Access misconfiguration Corrupt .htaccess file Missing index page Incompatible WordPress plugin Incorrect IP address Malware scan and security measures New web page link Empty website directory |
What Causes the 403 Forbidden Error?

Here are some possible reasons that can lead to the 403 Forbidden error:
1. Access misconfiguration: This means that users don’t have the necessary permissions to access certain parts of a website or sensitive files.
2. A corrupted.htaccess file: If the configuration file called.htaccess is damaged or infected with malware, it can cause issues and trigger the 403 Forbidden error.
3. Missing index page: The default homepage template, known as the index.html or index.php file, is not present in the website’s directory, which can lead to the 403 Forbidden error.
4. Incompatible WordPress plugin: This occurs when a plugin on a WordPress website conflicts with another plugin or has been configured incorrectly, resulting in the 403 Forbidden error.
5. Incorrect IP address: The domain name you are using points to an IP address that is blocking your access to the website.
6. Malware scan and security measures: The website’s security measures may limit access to specific resources to protect against malicious attacks, which can result in the 403 Forbidden error.
7. New web page link: If the webpage link has been recently updated or changed, it may no longer match the cached version, causing the 403 Forbidden error.
8. Empty website directory: When the URL you are trying to access points to the website’s directory instead of a specific file, it can trigger the 403 Forbidden error.
How to Fix the 403 Forbidden Error
Here are some steps you can take to fix a 403 Forbidden error:
1. Refresh the Page
Sometimes the error is temporary, and refreshing the page can resolve it. it means reloading the website you’re looking at. It’s like hitting a reset button that tells your browser to get the most up-to-date version of the page from the internet.
To refresh a web page, you can use one of the following methods:
1. Click the refresh/reload button: Most web browsers have a circular arrow icon in the toolbar, usually located near the address bar. Clicking this button will trigger a page refresh.
OR
2. Use the keyboard shortcut: Press the F5 key on your keyboard. This is a common keyboard shortcut across different browsers and operating systems for page refresh.
OR
3. Right-click and select “Refresh” or “Reload”: Right-click anywhere on the web page, and a context menu will appear. From the menu, choose the option that says “Refresh” or “Reload.”
2. Clear Your Browser Cache and Cookies
Clear Your Browser Cache and Cookies” means removing temporary files and all the stored data from your web browser. These files, known as cache and cookies, are created as you browse the internet and can sometimes cause issues, such as the 403 Forbidden error.
Caches help websites load faster, while cookies personalize your browsing experience. That’s why you might encounter the forbidden page error on a website where you frequently log in.
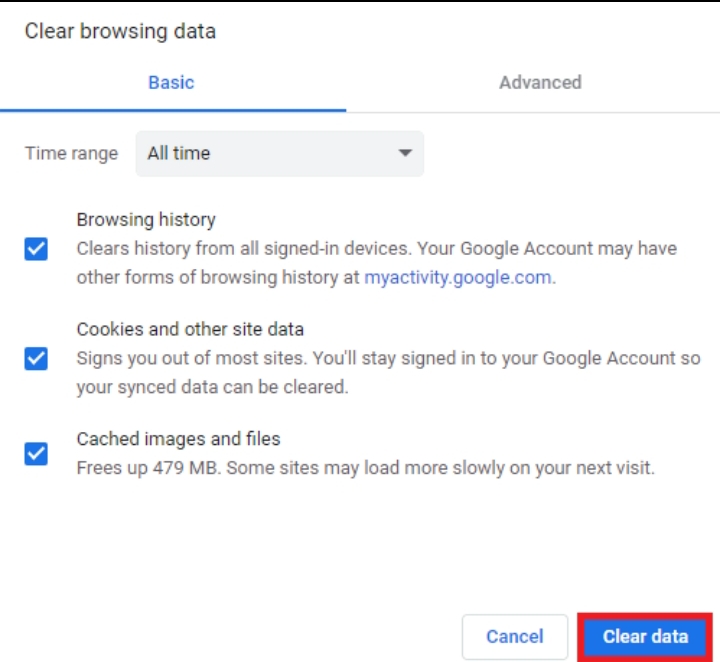
To clear your browser cache and cookies, you will need to follow these steps:
1. Open your web browser (e.g., Google Chrome, Firefox, Safari).
Click on the three-dot icon, you will see it in the top right corner and select “Settings.”
3. Look for “Privacy and security” and choose “Clear browsing data.”

4. You may also have the option to choose the time range for clearing. It’s usually recommended to select “All time” to remove all stored data.
5. Click on “Clear data” to delete them.

3. Double-Check the URL
Make sure you typed the website address correctly. Sometimes, a simple mistake like a misspelled URL can cause the 403 Forbidden error.
For example: If you’re trying to visit “example.com/page1,” make sure you didn’t accidentally type “examle.com/page1” instead.
4. Disable VPN or Proxy
If you are using a VPN (Virtual Private Network) or a proxy server, try disabling it temporarily to see if it resolves the issue. Sometimes these services can interfere with the proper access to a website.
5. Disable Security Plugins or Firewall
If you have security plugins or a firewall enabled on your website, they might be incorrectly blocking access. Temporarily disable them to see if it resolves the 403 Forbidden error.
For example: If you’re using a security plugin on your WordPress website, go to the plugin settings and look for an option to temporarily disable it. Test the website after disabling it to see if the error is gone.
6. Reset File and Directory Permissions
Reset File and Directory Permissions” is all about restoring the default access permissions for files and directories on a web server. File and directory permissions determine who can read, write, or execute files and folders on a server. Incorrect or misconfigured permissions can sometimes cause the 403 Forbidden error.
To reset file and directory permissions, you will typically need access to the server or the hosting control panel. Here’s a general guide on how to reset permissions:
1. Access your server or hosting control panel: This can be done through a web-based interface or via secure shell (SSH) if you have command-line access to the server.
2. Locate the file or directory: Identify the specific file or directory that is causing the 403 Forbidden error. This could be a specific file or a directory where the file is located.
3. Set file permissions: Right-click on the file or directory and select “Properties” or “Permissions.” Look for the numerical value usually displayed as 3 digits (e.g., 644, 755) or a series of checkboxes representing read, write, and execute permissions.
4. Reset permissions to default: Depending on your server or control panel, there may be an option to reset permissions to the default values. This can be a button or a command to restore the original permissions.
5. Apply changes: Save the changes after resetting the permissions.
6. Test the website: Try accessing the website again to see if the 403 Forbidden error is resolved. If the error persists, you may need to repeat the process for other files or directories that might be causing the issue.
6. Restore the .htaccess File
The .htaccess file is a powerful configuration file used by websites. However, even a small mistake in this file can lead to significant issues, such as the 403 Forbidden error. If your .htaccess file is infected or not properly configured, you can restore it by following these steps using an FTP client or file manager.
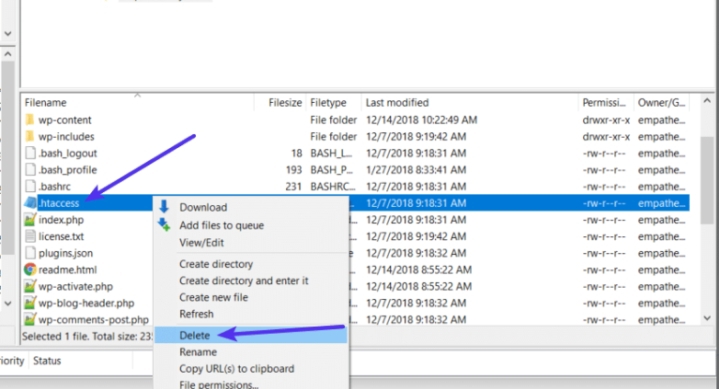
1. Go to your hosting panel, and navigate to Files → File Manager.
2. Open the public_html directory and locate the .htaccess file. Right-click on it and select Download to create a backup on your computer.

3. Delete the existing .htaccess file from your hosting account.

By following these steps, you can remove the existing .htaccess file without losing it entirely. This ensures that you have a backup copy in case you need it.
Now to generate a new and clean .htaccess file using WordPress:
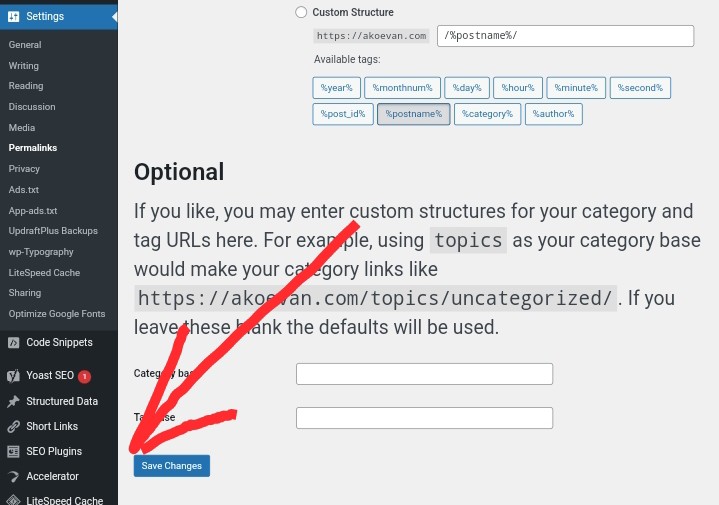
1. Go to your WordPress dashboard and navigate to Settings → Permalinks.
2. Without making any changes, simply click the “Save Changes” button at the bottom of the page.

After completing these steps, WordPress will automatically generate a new .htaccess file for you.
Now, you should be able to access your WordPress site without any issues, if the problem was related to the .htaccess file.
7. Scan for Malware
Scan for Malware” means checking your website for harmful software or code that can cause damage, compromise security, or disrupt its proper functioning. Performing a malware scan helps identify and remove any malicious elements from your website.
To scan for malware, you can use a security plugin called Wordfence. Here’s a simple explanation of how to do it:
1. Install the Wordfence plugin: In your WordPress dashboard, go to the “Plugins” section and click on “Add New.” Search for “Wordfence” and click on “Install Now” next to the Wordfence Security plugin. Once you have installed it, click on “Activate” to enable the plugin.
2. Configure Wordfence settings: After activation, you’ll see a new “Wordfence” option in your WordPress dashboard menu. Click on it and go to the “Scan” tab. Adjust the scan settings if needed, such as the scan type (full scan or specific files/folders) and the frequency of scans.
3. Start the malware scan: On the Wordfence Scan page, click on the “Start a Wordfence Scan” button. The plugin will then scan your website’s files, themes, plugins, and core WordPress files for any signs of malware.
4. Review the scan results: Once the scan is complete, Wordfence will display a summary of the findings. It will list any detected malware or suspicious files along with their locations on your website.
5. Take necessary actions: If malware is found, Wordfence offers options to remove or quarantine the infected files. Follow the instructions provided by Wordfence to mitigate the detected threats.
6. Enable firewall and security features: Wordfence also provides additional security features like a firewall and login protection. Consider enabling these features to enhance your website’s security and protect against future malware attacks.
8. Consult with Your Web Hosting Provider
If you have tried the above steps and are still experiencing the 403 Forbidden error, it’s advisable to reach out to your web hosting provider for assistance. They should be able to investigate the issue further and provide guidance specific to your hosting environment.
Read more:
How to Make Money on YouTube: A Beginner’s Guide
A Beginner’s Guide to Dropshipping: Everything You Need to Know
What is Google AdSense: How to make money on AdSense
How to drive traffic to your website
What are the best hosting website
What is Structured Data Markup: how it works
What is web hosting? And how it works, benefits


Leave a Review